Build your first Firebase powered Ionic app
NOTE: This guide assumes no previous knowledge of Ionic, Angular, or Firebase. If you’d like a refresher on your JavaScript you could take Wes Bos’ free JavaScript30 course or jump directly into ES6 for Everyone.
The first thing we’ll do is to make sure we’ve got everything ready to start building Ionic and Firebase applications, and for that, we’ll install a few things.
Let’s ensure we have node and npm installed on our computer. The best way to handle node is through nvm (node version manager).
Installing dependencies
After we have node and npm installed, we want to install the Ionic and the Firebase CLI. For that, we’re going to open our terminal and type:
npm install -g @ionic/cli firebase-tools
To make sure both packages were installed, go to our terminal and type:
ionic --version
firebase --version
We should see the versions, if we see something like command not found: ionic or
command not found: firebase means that package isn’t installed.
NOTE: Versions might not match what you see here depending on when you are reading this guide.
ionic --version
7.2.0
firebase --version
13.22.0
Creating our Application
Now that everything is installed and ready to go, it’s time to create our first application. To do that, let’s go to the terminal again, navigate to whatever folder we use for our projects, and type:
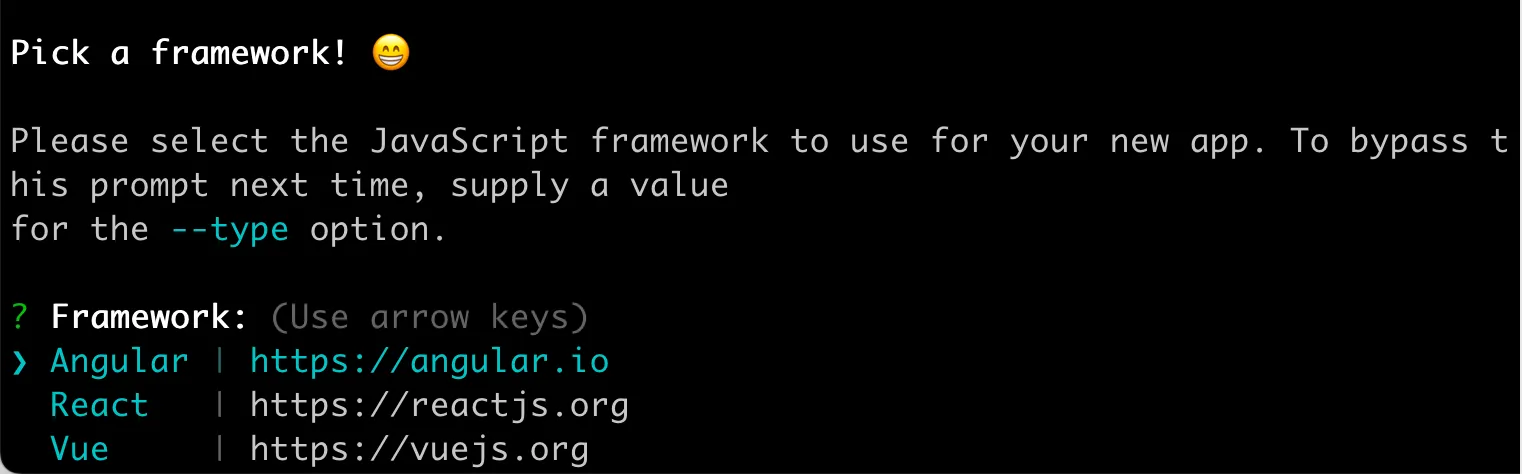
ionic start party-planner blank
Where party-planner is the application’s name and blank is the template we’re using to
initialize our application, it will start a helper that will ask us a few questions.
You can always type
ionic start --listin the terminal and see the complete list of starter templates.
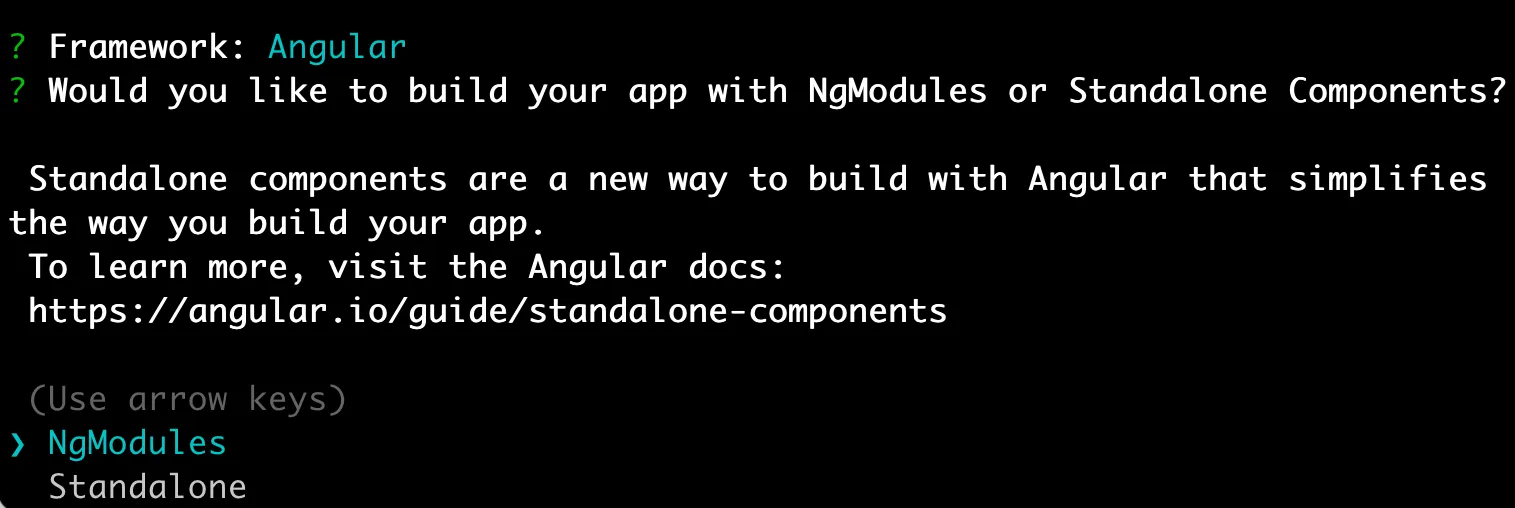
First, it will ask us the UI framework we’ll use for the application, Angular, React, or Vue. We’ll pick Angular.
After picking Angular, the CLI is going to ask us if we’d like to use NgModules or Standalone
we’re going to pick Standalone, which is the new way to build with Angular that simplifies the way
you build your app.
Now we need to give the CLI a few moments to create everything. Once it’s done, we can open the application folder in our preferred code editor, I use VS Code, but you can use whatever works best for you.
While we’re checking out the app, we’ll open the package.json file. We’ll see all the packages we
have installed and their versions, it looks something like this:
{
  "name": "party-planner",
  "version": "0.0.1",
  "author": "Ionic Framework",
  "homepage": "https://ionicframework.com/",
  "scripts": {
    "ng": "ng",
    "start": "ng serve",
    "build": "ng build",
    "watch": "ng build --watch --configuration development",
    "test": "ng test",
    "lint": "ng lint"
  },
  "private": true,
  "dependencies": {
    "@angular/animations": "^18.2.8",
    "@angular/common": "^18.2.8",
    "@angular/compiler": "^18.2.8",
    "@angular/core": "^18.2.8",
    "@angular/forms": "^18.2.8",
    "@angular/platform-browser": "^18.2.8",
    "@angular/platform-browser-dynamic": "^18.2.8",
    "@angular/router": "^18.2.8",
    "@capacitor/app": "6.0.1",
    "@capacitor/core": "6.1.2",
    "@capacitor/haptics": "6.0.1",
    "@capacitor/keyboard": "6.0.2",
    "@capacitor/status-bar": "6.0.1",
    "@ionic/angular": "^8.3.2",
    "ionicons": "^7.2.1",
    "rxjs": "~7.8.1",
    "tslib": "^2.3.0",
    "zone.js": "~0.14.2"
  },
  "devDependencies": {
    "@angular-devkit/build-angular": "^18.2.8",
    "@angular-eslint/builder": "^18.3.1",
    "@angular-eslint/eslint-plugin": "^18.3.1",
    "@angular-eslint/eslint-plugin-template": "^18.3.1",
    "@angular-eslint/schematics": "^18.3.1",
    "@angular-eslint/template-parser": "^18.3.1",
    "@angular/cli": "^18.2.8",
    "@angular/compiler-cli": "^18.2.8",
    "@angular/language-service": "^18.2.8",
    "@capacitor/cli": "6.1.2",
    "@ionic/angular-toolkit": "^11.0.1",
    "@types/jasmine": "~5.1.4",
    "@typescript-eslint/eslint-plugin": "^6.0.0",
    "@typescript-eslint/parser": "^6.0.0",
    "eslint": "^8.57.0",
    "eslint-plugin-import": "^2.29.1",
    "eslint-plugin-jsdoc": "^48.2.1",
    "eslint-plugin-prefer-arrow": "1.2.3",
    "jasmine-core": "~5.1.0",
    "jasmine-spec-reporter": "~5.0.0",
    "karma": "~6.4.4",
    "karma-chrome-launcher": "~3.2.0",
    "karma-coverage": "~2.2.1",
    "karma-jasmine": "~5.1.0",
    "karma-jasmine-html-reporter": "~2.1.0",
    "typescript": "~5.4.0"
  },
  "description": "An Ionic project"
}
After we make sure everything looks ok, we want to install the package we’ll use to build our application.
In the past we had to install the packages and do some configurations, but thanks to the amazing
James Daniels who created the ng add schematic, we can now use one
single command that will handle ALL the configuration for you.
And I do mean all the configuration, you’ll be able to even create a firebase project from there 🎉.
To get it running, you’ll need to open the terminal in the root of your project and type:
ng add @angular/fire
This will start showing you prompts in the CLI and start asking questions for you to answer, things like:
- Picking which Firebase project to use.
- Picking which app inside the project (in case you have many).
- Creating a new app (or even a new project).
- Which Firebase APIs you’ll want to use (Authentication, Firestore, Hosting, etc.).
Once you’re done choosing, it will update your Ionic application, adding the Firebase credentials,
all of the initialization code to the main.ts file, and all the firebase configuration files.
Before moving forward we have to 2 one thing on that main.ts file. Open the file in your editor
and import Capacitor:
import { Capacitor } from '@capacitor/core';
Then go into the bootstrapApplication() method and look for this line:
provideAuth(() => getAuth());
And replace it with:
provideAuth(() => {
  if (Capacitor.isNativePlatform()) {
    return initializeAuth(getApp(), {
      persistence: indexedDBLocalPersistence,
    });
  } else {
    return getAuth();
  }
}),
The check we’re doing on the initialization of Firebase Authentication is because the regular auth
init does not work when the app is built through Capacitor. So we need to add
indexedDBLocalPersistence.
We do this because when the app is built through Capacitor the regular web initialization doesn’t work for Firebase Authentication.
NOTE: If you have any issues at this point, you can check out the complete source code for the application in its Github repository
The Firebase Console
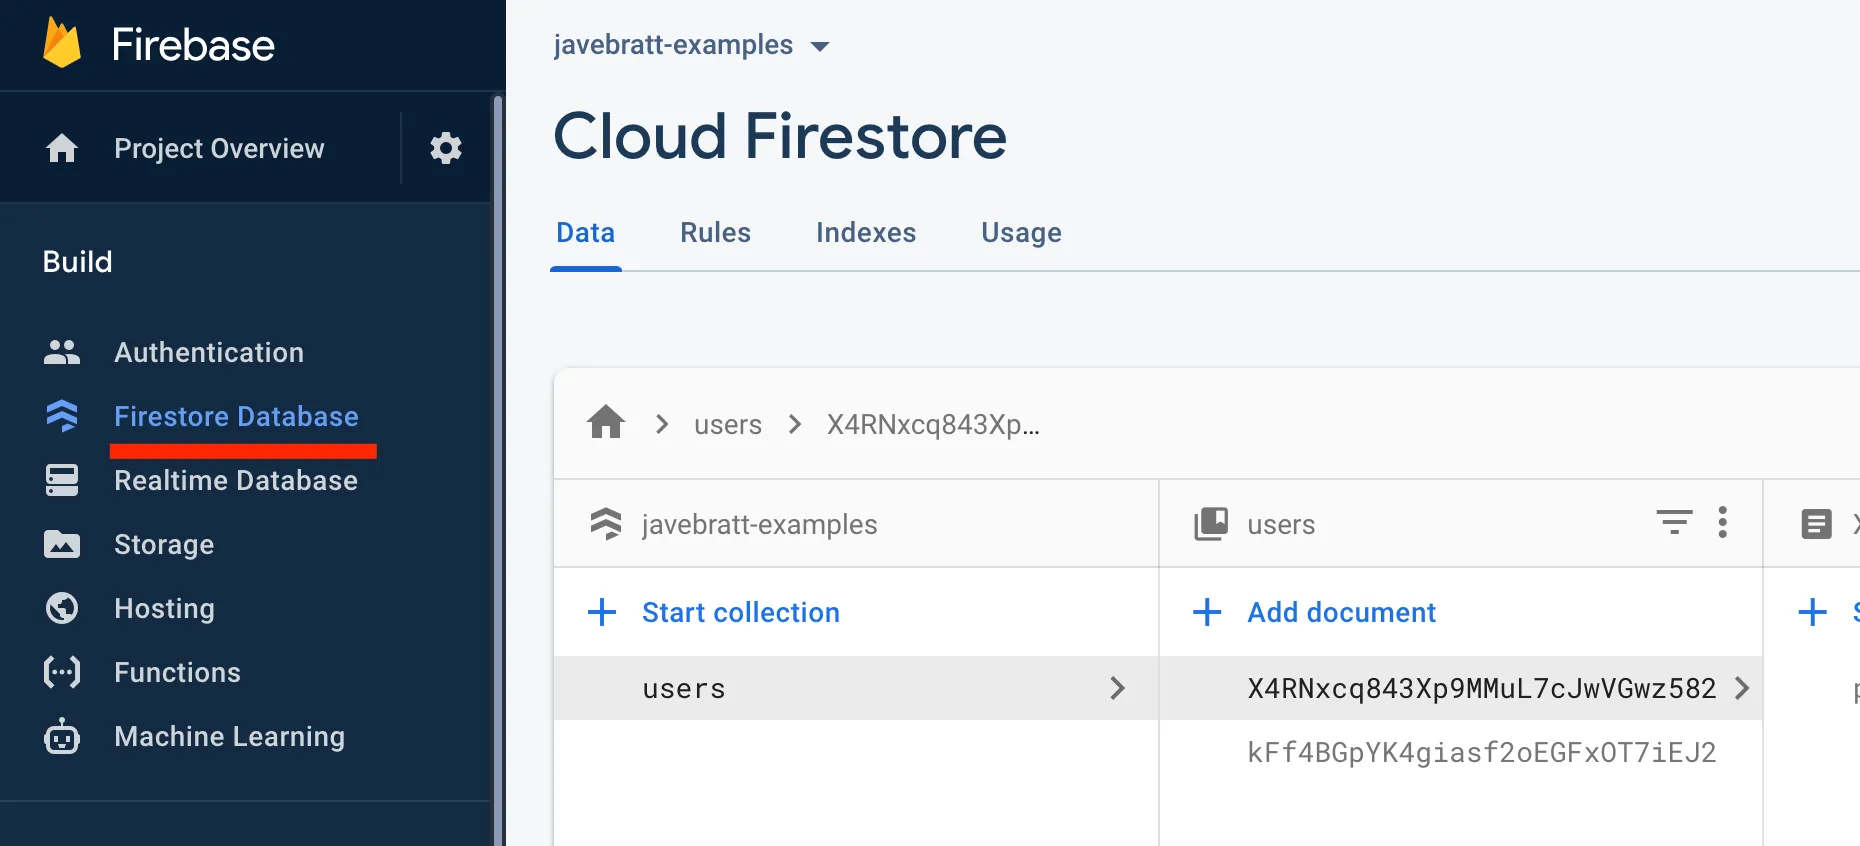
Now let’s go to our Firebase project console, you can open a browser window and go to https://console.firebase.google.com.
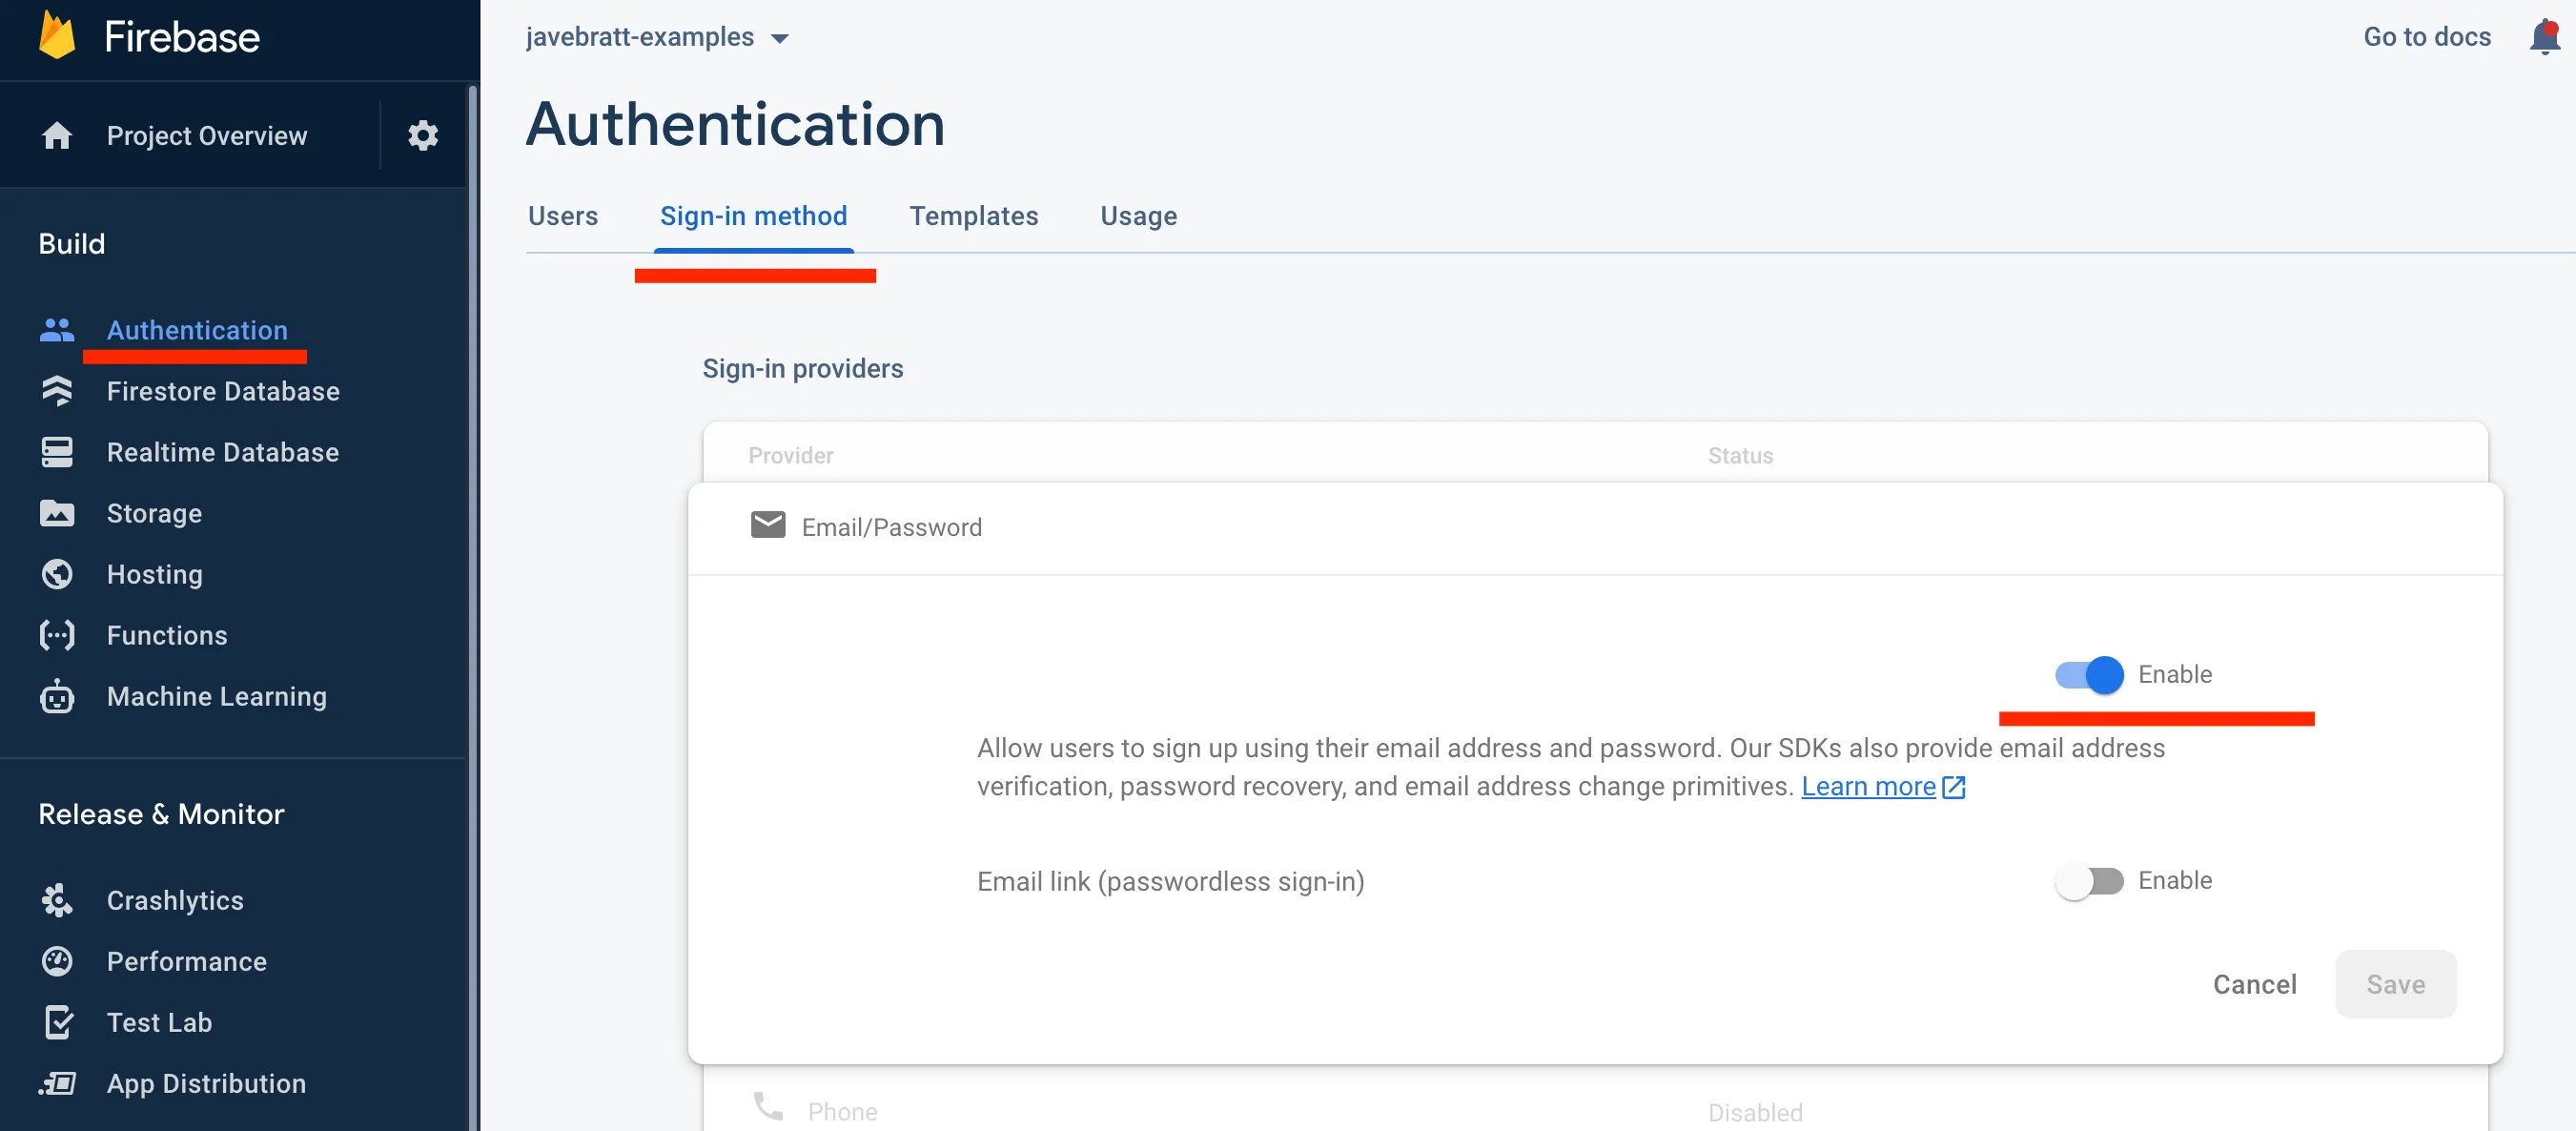
While you’re in the Firebase Console, go ahead and enable both email/password authentication and the Firestore database. If not, we’ll run into issues later.
To enable email & password authentication, we need to go to the Authentication menu, then go to Sign In options, and enable email and password as shown in the image below
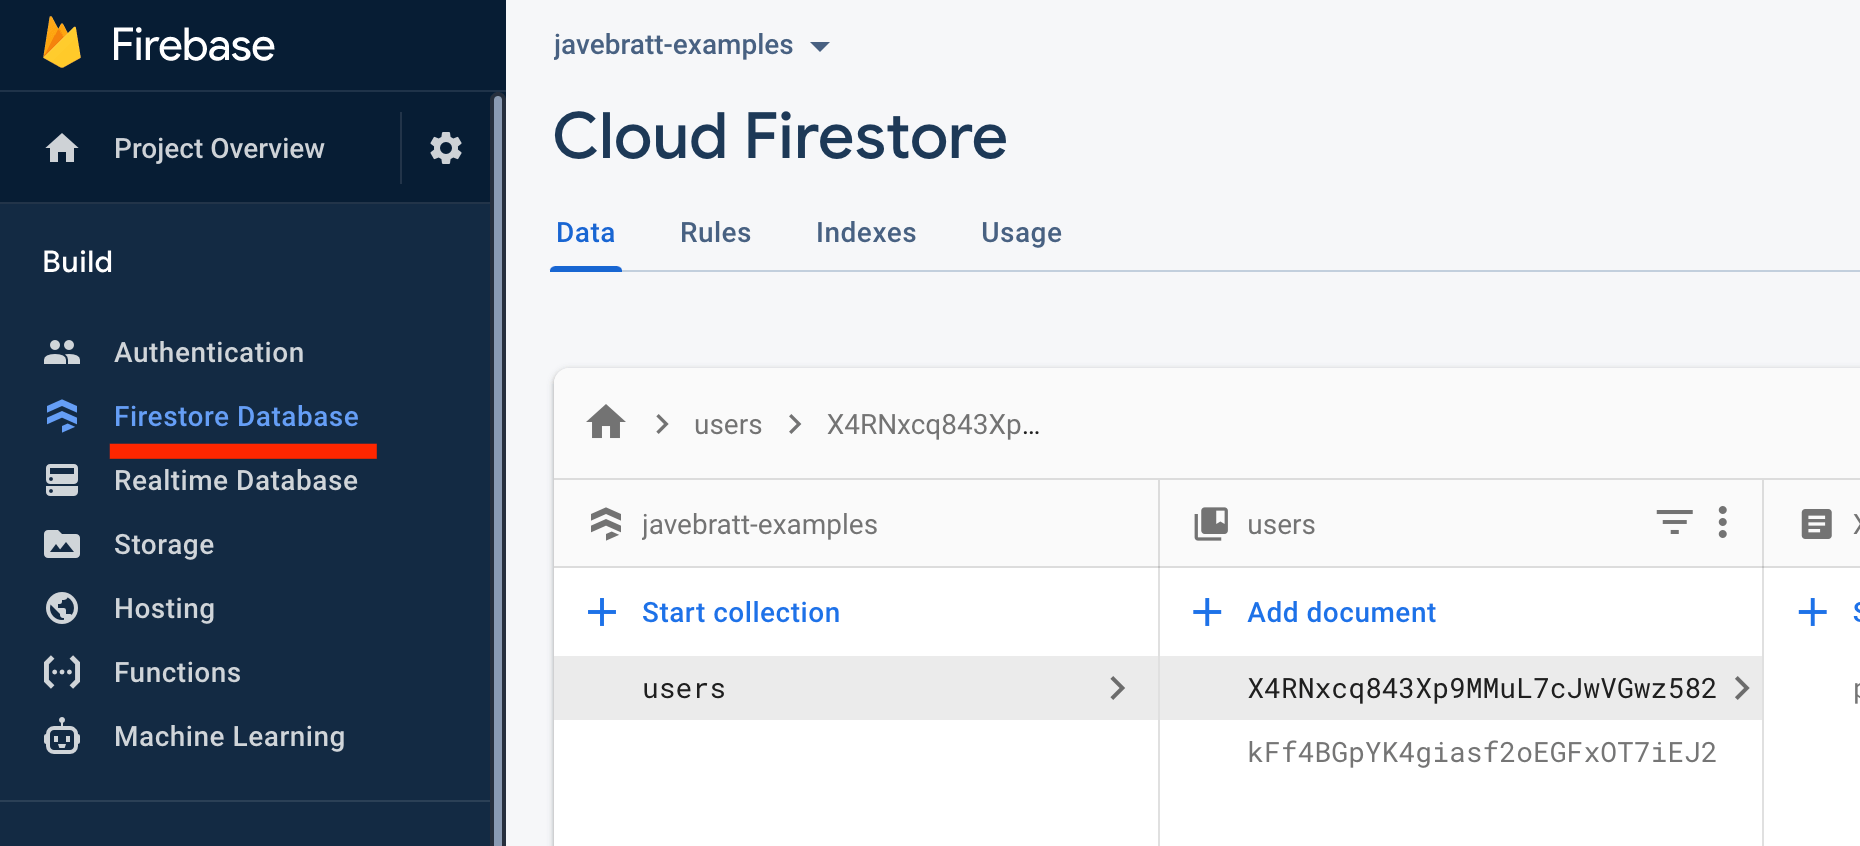
To create your Firestore database, you need to go to the Firestore option in the menu, click on Create Firestore Database and select to start with Test Mode.
At this point, we should be able to run ionic serve in the terminal and have our application running without any compile or build errors.
If you have errors here and want some help, remember you can send me a quick note through Linkedin.
And that’s it, now you have the skeleton of an app ready to work, let’s do a quick recap of how we got there!
- Step #1: You made sure all the needed packages were up-to-date and installed.
- Step #2: You used the Ionic CLI to create the app.
- Step #3: You used the ng add @angular/fire schematic to set everything up.
- Step #4: You set up Firebase Authentication and Firestore in the Firebase console.
User Authentication
One of the most common (an important) parts of a modern application is user authentication. Throughout this section, we’ll learn:
- How to create a page to handle user authentication.
- How to create and reuse a component for login, signup, and reset password.
- How to talk to Firebase Authentication functions.
- How to create a guard to prevent unauthenticated users from accessing a page.
Create the Authentication Page
The first thing we want to do, is to create a page where we will handle everything related to authentication.
To do that, we open the terminal in the root of our project, and we type:
ionic generate page authentication
If you want to know what that script does before typing it, you can append the flag —dry-run, and call it like this:
ionic generate page authentication --dry-run
Then you can see the files it will generate, and the files it will update like this:
CREATE src/app/authentication/authentication.page.scss (0 bytes)
CREATE src/app/authentication/authentication.page.html (318 bytes)
CREATE src/app/authentication/authentication.page.spec.ts (493 bytes)
CREATE src/app/authentication/authentication.page.ts (575 bytes)
UPDATE src/app/app.routes.ts (394 bytes)
[OK] Generated page!
Once we’re comfortable with the result on the console, we can run the script without the —dry-run flag and generate those files.
Before we move into the authentication files, let’s add a new file called
src/app/authentication/authentication.routes.ts, we’ll add our routes and it should look like
this:
import { Routes } from '@angular/router';

import { AuthenticationPage } from './authentication.page';

export const routes: Routes = [
  {
    path: '',
    component: AuthenticationPage,
  },
  {
    path: 'login',
    component: AuthenticationPage,
  },
  {
    path: 'signup',
    component: AuthenticationPage,
  },
  {
    path: 'reset',
    component: AuthenticationPage,
  },
  { path: '**', redirectTo: 'login', pathMatch: 'full' },
];
And we’ll also go to the src/app/app.routes.ts file so that we can call add this routes:
import { Routes } from '@angular/router';

export const routes: Routes = [
  {
    path: 'auth',
    loadChildren: () =>
      import('./authentication/authentication.routes').then((m) => m.routes),
  },
];
You can also remove the src/app/home/* entire folder since we won’t use it.
The changes we made in the src/app/app.routes.ts file means that when the user navigates to
/auth/** it will load the authentication routes.
And in the authentication routes we have set up routes for our urls: login, signup, or reset.
Now, we also want to create the authentication form component. We’ll use it to load the authentication form depending on the page we’re on.
For that, let’s open the terminal and type:
ionic generate component authentication/auth-form --dry-run
Where you can see in the output the files it will generate:
> ng generate component authentication/auth-form --dry-run --project=app
CREATE src/app/authentication/auth-form/auth-form.component.scss (0 bytes)
CREATE src/app/authentication/auth-form/auth-form.component.html (28 bytes)
CREATE src/app/authentication/auth-form/auth-form.component.spec.ts (711 bytes)
CREATE src/app/authentication/auth-form/auth-form.component.ts (280 bytes)

NOTE: The "--dry-run" option means no changes were made.
After reviewing that those are the files and paths we were expecting, we can run that command again
without the --dry-run flag.
Once we create the component, let’s open the
src/app/authentication/auth-form/auth-form.component.ts file, and add the standalone: true to
the decorator
import { Component } from '@angular/core';

@Component({
  selector: 'app-auth-form',
  templateUrl: './auth-form.component.html',
  styleUrls: ['./auth-form.component.scss'],
  standalone: true,
})
export class AuthFormComponent {
  constructor() {}
}
Now it’s an excellent time to test that everything is working, for that, let’s open the
src/app/authentication/authentication.page.html and it should look something like this:
<ion-header [translucent]="true">
  <ion-toolbar>
    <ion-title>authentication</ion-title>
  </ion-toolbar>
</ion-header>

<ion-content [fullscreen]="true">
  <ion-header collapse="condense">
    <ion-toolbar>
      <ion-title size="large">authentication</ion-title>
    </ion-toolbar>
  </ion-header>
</ion-content>
Let’s change the page title, and add our authentication component:
<ion-header [translucent]="true">
  <ion-toolbar>
    <ion-title>Authentication</ion-title>
  </ion-toolbar>
</ion-header>

<ion-content [fullscreen]="true">
  <app-auth-form></app-auth-form>
</ion-content>
And now, let’s go to src/app/authentication/authentication.page.ts and add the auth form component as an import there.
import { CommonModule } from '@angular/common';
import { Component } from '@angular/core';
import { FormsModule } from '@angular/forms';
import { IonContent, IonHeader, IonTitle, IonToolbar } from '@ionic/angular/standalone';
import { AuthFormComponent } from './auth-form/auth-form.component';

@Component({
  selector: 'app-authentication',
  templateUrl: './authentication.page.html',
  styleUrls: ['./authentication.page.scss'],
  standalone: true,
  imports: [
    IonContent,
    IonHeader,
    IonTitle,
    IonToolbar,
    CommonModule,
    FormsModule,
    AuthFormComponent, // This one right here
  ],
})
export class AuthenticationPage {
  constructor() {}
}
Now let’s go ahead and in the terminal type
ionic serve
It will create a local development server to run the application, pay attention to the port so that we can run the app in the browser.
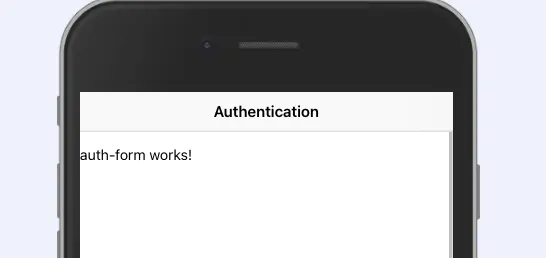
By default, it uses the port 8100, so you can go to localhost:8100/login and you can see a
message that says auth-form works!.
The Authentication Component
Now that we have our authentication-form component, it is time to create the form itself so that
our users can login, signup, or reset their passwords.
First, we want to import the ReactiveFormsModule, an angular forms module that lets us build
reactive forms.
You can add it to the imports array:
import { Component } from '@angular/core';
import { ReactiveFormsModule } from '@angular/forms';

@Component({
  selector: 'app-auth-form',
  templateUrl: './auth-form.component.html',
  styleUrls: ['./auth-form.component.scss'],
  standalone: true,
  imports: [ReactiveFormsModule],
})
export class AuthFormComponent {
  constructor() {}
}
Now, we can start setting up the functionality we need for the form, for that, we want to import a
few things, so go into the auth-form.component.ts file and import the following packages:
import { Component, input, output, inject } from '@angular/core';
import { ReactiveFormsModule, FormGroup, Validators, FormBuilder } from '@angular/forms';
We’re importing:
inputto take on properties from the parent component.outputto send the user credentials back to the authentication page.FormGroup,Validators,FormBuilderare part of the angular reactive forms and we’ll use them to handle the forms in our component.
Then, we’ll create our class variables, and inject the Angular’s form builder:
import { Component, inject, input, output } from '@angular/core';
import {
  FormBuilder,
  FormGroup,
  ReactiveFormsModule,
  Validators,
} from '@angular/forms';

@Component({
  selector: 'app-auth-form',
  templateUrl: './auth-form.component.html',
  styleUrls: ['./auth-form.component.scss'],
  standalone: true,
  imports: [ReactiveFormsModule],
})
export class AuthFormComponent {
  private readonly formBuilder = inject(FormBuilder);

  actionButtonText = input<string>('Sign In');
  isPasswordResetPage = input<boolean>(false);

  formSubmitted = output<any>();

  readonly authForm: FormGroup;
}
Where:
actionButtonTextis an input signal which determines the text our form’s button will have.isPasswordResetPageis a flag to determine if we’re in the password reset page or not.formSubmittedis an output signal, this will send the value of our form back to the parent page.authFormthis is our form.
Next, we’ll initialize our form, go back to the authForm declaration:
readonly authForm: FormGroup = this.formBuilder.group({
  email: ['', Validators.compose([Validators.required, Validators.email])],
  password: [
    '',
    Validators.compose([
      !this.isPasswordResetPage ? Validators.required : null,
      Validators.minLength(6),
    ]),
  ],
});
We’re doing three things:
- We’re initializing the fields our form will have, in this case, email and password.
- We’re adding the validators each field will have.
- We’re making sure the required validator on the password field is only active if the page is NOT the password reset page (Since the password reset page will only have the email field).
And lastly, we’ll create a function called submitCredentials(), this function will simply send
whatever value the form has to the parent page:
submitCredentials(authForm: FormGroup): void {
  if (!authForm.valid) {
    console.log('Form is not valid yet, current value:', authForm.value);
  } else {
    const credentials = {
      email: authForm.value.email,
      password: authForm.value.password,
    };
    this.formSubmitted.emit(credentials);
  }
}
Now our component is ready to be designed, for that, let’s move to auth-form.component.html, right
now it should probably look like this:
<p>auth-form works!</p>
Delete everything and start by creating our form:
<form [formGroup]="authForm"></form>
We’re binding the formGroup property to our authentication form, next, we want to add a couple of
fields, one for the email, and another one for the password:
<form [formGroup]="authForm">
  <ion-input
    formControlName="email"
    type="email"
    placeholder="Your email address"
    label="Email:"
    fill="outline"
    helper-text="Please enter a valid email address"
  />

  @if(!isPasswordResetPage()) {
  <ion-input
    formControlName="password"
    type="password"
    placeholder="Your password"
    label="Password:"
    fill="outline"
    helper-text="Please enter your password"
  />
  }
</form>
There are a few things happening here:
- First, we are using
formControlNameto bind our inputs in the template to the inputs we created in our form. - Second, we’re using the angular control flow
@if()instead of*ngIfsince this is the new and preferred way to use these directives in the template. - And third, we’re using the
isPasswordResetPage()signal to hide/show the password input depending if we’re on the reset password page or not.
Now, we’ll add a button that will call the submitCredentials() function and send the result of the
form:
<form [formGroup]="authForm">
  <ion-input
    formControlName="email"
    type="email"
    placeholder="Your email address"
    label="Email:"
    fill="outline"
    helper-text="Please enter a valid email address"
  />

  @if(!isPasswordResetPage()) {
  <ion-input
    formControlName="password"
    type="password"
    placeholder="Your password"
    label="Password:"
    fill="outline"
    helper-text="Please enter your password"
  />
  }

  <ion-button (click)="submitCredentials(authForm)" expand="block" [disabled]="!authForm.valid">
    {{ actionButtonText() }}
  </ion-button>
</form>
We’re using [disabled]="!authForm.valid" to tell our submit button to only be active once the form
is valid.
At this point you might get a couple of errors depending on the editor you’re using, some auto import everything you need, some don’t.
Go to src/app/authentication/auth-form/auth-form.component.ts and make sure both IonButton and
IonInput are a part of the imports array, you can import both from
'@ionic/angular/standalone';
@Component({
  selector: 'app-auth-form',
  templateUrl: './auth-form.component.html',
  styleUrls: ['./auth-form.component.scss'],
  standalone: true,
  imports: [IonButton, ReactiveFormsModule, IonInput],
})
To finish this, let’s go to the auth-form.component.scss file and add some spacing and styles to
our form:
form {
  padding: 12px;
  margin-bottom: 32px;
  ion-button {
    margin-top: 30px;
  }
}

p {
  font-size: 0.8em;
  color: #d2d2d2;
}

ion-label {
  margin-left: 5px;
}

ion-input {
  padding: 5px;
}
The Authentication Page
Now it’s time to use our component, and for that, we’ll go into the authentication page itself.
Let’s open src/app/authentication/authentication.page.ts, and add everything we’ll need for this
first part, I’ll cover what everything is inside of the comments:
import { CommonModule } from '@angular/common';
import { Component, inject } from '@angular/core';
import { FormsModule } from '@angular/forms';
import { Router, RouterLink } from '@angular/router';
import {
  IonBackButton,
  IonButtons,
  IonContent,
  IonHeader,
  IonTitle,
  IonToolbar,
} from '@ionic/angular/standalone';
import { AuthFormComponent } from './auth-form/auth-form.component';

@Component({
  selector: 'app-authentication',
  templateUrl: './authentication.page.html',
  styleUrls: ['./authentication.page.scss'],
  standalone: true,
  imports: [
    IonBackButton,
    IonButtons,
    IonContent,
    IonHeader,
    IonTitle,
    IonToolbar,
    CommonModule,
    FormsModule,
    AuthFormComponent,
    RouterLink
  ],
})
export class AuthenticationPage {
  /**
   * We're injecting the router to get the current URL
   */
  private readonly router = inject(Router);

  /**
   * From the current URL, we're getting the last part
   * of the URL to determine the current page.
   */
  readonly currentPage = this.router.url.split('/')[
    this.router.url.split('/').length - 1
  ] as 'login' | 'signup' | 'reset';

 /**
   * This object holds the configuration for the authentication page.
   * It has the page title and action button text for each page.
   * That way we don't need switch case or if/else to determine this values
   */
  readonly AUTH_PAGE_CONFIG = {
    login: {
      pageTitle: 'Sign In',
      actionButtonText: 'Sign In',
    },
    signup: {
      pageTitle: 'Create your account',
      actionButtonText: 'Create Account',
    },
    reset: {
      pageTitle: 'Reset your password',
      actionButtonText: 'Reset Password',
    },
  };

  /**
   * Here we assign the page title and button text based
   * on our configuration object.
   */
  readonly pageTitle = this.AUTH_PAGE_CONFIG[this.currentPage].pageTitle;
  readonly actionButtonText =
    this.AUTH_PAGE_CONFIG[this.currentPage].actionButtonText;

  /**
  * This method gets the form value from the authentication component,
  * then it calls the respective method.
  */
  handleUserCredentials(userCredentials: UserCredentials) {
    switch (this.currentPage) {
      case 'login':
        this.login(userCredentials);
        break;
      case 'signup':
        this.signup(userCredentials);
        break;
      case 'reset':
        this.resetPassword(userCredentials);
        break;
    }
  }

  // This will hold the logic for the login function.
  login({ email, password }: UserCredentials) {
    console.log(email, password);
  }

  // This will hold the logic for the signup function.
  signup({ email, password }: UserCredentials) {
    console.log(email, password);
  }

  // This will hold the logic for the resetPassword function.
  resetPassword({ email }: UserCredentials) {
    console.log(email);
  }
}

export interface UserCredentials {
  email: string;
  password?: string;
}
Now let’s visit src/app/authentication/authentication.page.html, it looks something like this:
<ion-header>
  <ion-toolbar>
    <ion-title>authentication</ion-title>
  </ion-toolbar>
</ion-header>

<ion-content [fullscreen]="true">
  <app-auth-form></app-auth-form>
</ion-content>
The first thing we’ll do is to replace the header with something more custom:
<ion-header>
  <ion-toolbar>
    @if(currentPage !== 'login') {
    <ion-buttons slot="start">
      <ion-back-button defaultHref="/auth/login"></ion-back-button>
    </ion-buttons>
    }
    <ion-title>{{ pageTitle }}</ion-title>
  </ion-toolbar>
</ion-header>

<ion-content [fullscreen]="true">
  <app-auth-form></app-auth-form>
</ion-content>
It will add a dynamic page title, and it will add the Ionic back button if we’re on a page different than the login page.
Next, we want to send all the correct properties to the authentication form:
<ion-content [fullscreen]="true">
  <app-auth-form
    (formSubmitted)="handleUserCredentials($event)"
    [actionButtonText]="actionButtonText"
    [isPasswordResetPage]="currentPage === 'reset'"
  ></app-auth-form>
</ion-content>
We’re telling our component what function to use to handle the form value, and sending the correct properties depending on the page we’re on.
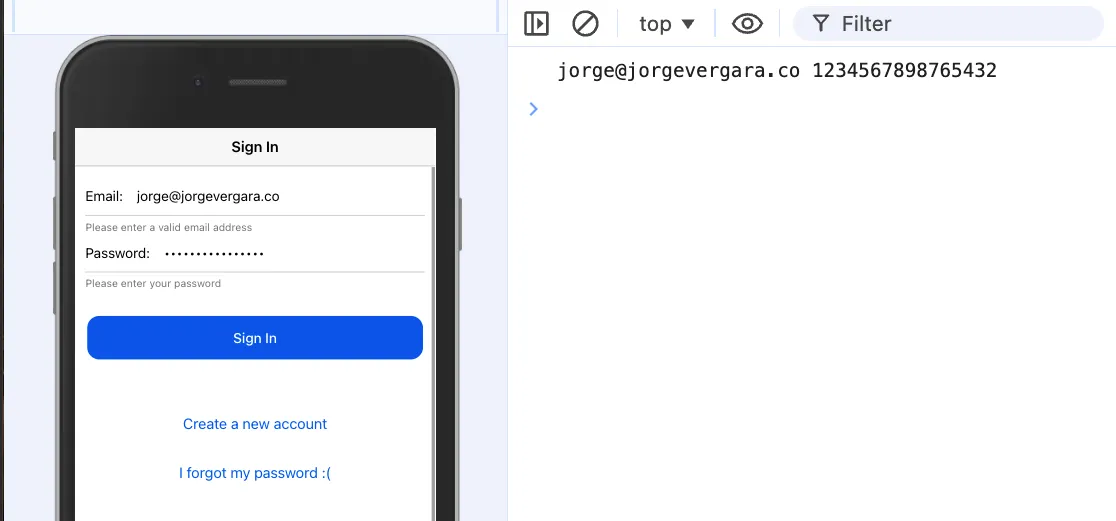
And lastly, we want to add two links to the page, one to create a new account, and the other one to navigate to the password reset page, in the end, the page should look like this:
<ion-header>
  <ion-toolbar>
    @if(currentPage !== 'login') {
    <ion-buttons slot="start">
      <ion-back-button defaultHref="/auth/login"></ion-back-button>
    </ion-buttons>
    }
    <ion-title>{{ pageTitle }}</ion-title>
  </ion-toolbar>
</ion-header>

<ion-content [fullscreen]="true">
  <app-auth-form
    (formSubmitted)="handleUserCredentials($event)"
    [actionButtonText]="actionButtonText"
    [isPasswordResetPage]="currentPage === 'reset'"
  ></app-auth-form>

  @if (currentPage !== 'signup') {
  <ion-button expand="block" fill="clear" routerLink="/auth/signup">
    Create a new account
  </ion-button>
  } @if (currentPage !== 'reset') {
  <ion-button expand="block" fill="clear" routerLink="/auth/reset">
    I forgot my password :(
  </ion-button>
  }
</ion-content>
Remember, at any point, you can run your app to make sure it’s all coming along nicely, and you don’t have compile/build errors, for that open the terminal and type:
ionic serve
And then navigate to localhost:8100/login, localhost:8100/signup, or localhost:8100/reset,
that way you’ll be able to see the differences in the form, and the page title.
Now it is time to give our authentication module actual authentication functionality. For that, we’ll start connecting to Firebase.
NOTE: It is a good practice to separate the business logic into services. That way, we can make changes to those services that affect the entire application.
We’ll create a service to handle all of our authentication functionality, for that, stop the terminal if you’re serving your application, and type:
ionic generate service authentication/authentication
It will generate the file src/app/authentication/authentication.service.ts where we’ll start adding all the Firebase related information, let’s go into that file and quickly import everything we need:
import { inject, Injectable } from '@angular/core';
import {
  Auth,
  createUserWithEmailAndPassword,
  sendPasswordResetEmail,
  signInWithEmailAndPassword,
  signOut,
  User,
  user,
  UserCredential,
} from '@angular/fire/auth';
import { from, Observable } from 'rxjs';
I’ll go over all the @angular/fire/auth as we encounter them. Once everything is imported, let’s
inject auth, this is the AngularFire’s auth instance and initialization:
private readonly auth = inject(Auth);
And then let’s start adding the functions we’d like to have. First, we want a function to return the current user:
getUser(): Observable<User | null> {
  return user(this.auth);
}
The getUser() function returns the current user logged into the application. This uses the
provided user observable, using an observable we ensure the user object is ready to be used before
calling it.
Next we’re using @angular/fire provided functions to login, signup, logout, and reset the user’s
password.
login(email: string, password: string): Observable<UserCredential> {
  return from(signInWithEmailAndPassword(this.auth, email, password));
}

signup(email: string, password: string): Observable<UserCredential> {
  return from(createUserWithEmailAndPassword(this.auth, email, password));
}

resetPassword(email: string): Observable<void> {
  return from(sendPasswordResetEmail(this.auth, email));
}

logout(): Observable<void> {
  return from(signOut(this.auth));
}
Now we’re ready to go back to our auth page and connect that functionality. Open your
authentication.page.ts file, and inject the auth service too:
private readonly auth = inject(AuthenticationService);
Next, we’re going to add the functionality to our placeholder functions for login, signup, and reset.
Each function needs to do 2 things, call the appropriate function on the service with the correct data, and navigate the user either to the home page or the login page.
login({ email, password }: UserCredentials) {
  this.authenticationService
    .login(email, password)
    .pipe(tap(() => this.router.navigateByUrl('')))
    .subscribe();
}

signup({ email, password }: UserCredentials) {
  this.authenticationService
    .signup(email, password)
    .pipe(tap(() => this.router.navigateByUrl('')))
    .subscribe();
}

resetPassword({ email }: UserCredentials) {
  this.authenticationService
    .resetPassword(email)
    .pipe(tap(() => this.router.navigateByUrl('auth/login')))
    .subscribe();
}
NOTE: Handling and optimizing Observables is out of the scope of this article, so if you use it as-is and subscribe to those observables inside the page, make sure to set up the subscription so that you can unsubscribe on the
ngOnDestroy()hook. You can see it in the source code.
And that’s it. We now have a fully functional authentication system that will take care of most of the needs of an application. In the next section, we’ll start using the Firestore database, and we’ll create some new pages. I’ll show you how to use this guard to protect those pages.
Interacting with your Firestore Database
One of the essential parts of an application is CRUD, creating, reading, updating, and deleting data from the database. Firebase provides a document-oriented NoSQL database for us: Firestore.
We’ll use the database in a new page, where we have all of that functionality encapsulated.
We’ll create the Party page, where we’ll handle everything related to events, creating them,
updating them, deleting them, etc.
For that, let’s open the terminal and generate a new Ionic page with the following line:
ionic generate page party
You can inspect the terminal’s output and see the files it generated and the files it updated:
> ng generate page party --project=app
CREATE src/app/party/party.page.scss (0 bytes)
CREATE src/app/party/party.page.html (300 bytes)
CREATE src/app/party/party.page.spec.ts (439 bytes)
CREATE src/app/party/party.page.ts (539 bytes)
UPDATE src/app/app.routes.ts (383 bytes)
[OK] Generated page!
Now we want to go ahead and add the routes, so first, let’s go to src/app/party/party.routes.ts and create the routes:
import { Routes } from '@angular/router';
import { PartyPage } from './party.page';

export const routes: Routes = [
  {
    path: '',
    component: PartyPage,
  },
];
We’ll then add the Party route(s) to the app.routes.ts file:
import { AuthGuard, redirectUnauthorizedTo } from '@angular/fire/auth-guard';
import { Routes } from '@angular/router';

const redirectUnauthorizedToLogin = () => redirectUnauthorizedTo('/auth/login');

export const routes: Routes = [
  {
    path: '',
    redirectTo: 'party',
    pathMatch: 'full',
  },
  {
    path: 'party',
    loadChildren: () => import('./party/party.routes').then((m) => m.routes),
    canActivate: [AuthGuard],
    data: { authGuardPipe: redirectUnauthorizedToLogin },
  },
  {
    path: 'auth',
    loadChildren: () =>
      import('./authentication/authentication.routes').then((m) => m.routes),
  },
];
Once we have that, let’s understand what we need our Party folder for:
- We need the Party page where we’ll show a list of parties (this is the one we just created).
- A component to show the details of a specific party.
- A component to create a new party.
- A service to interact with Firebase.
Let’s create the files themselves now so that we can serve our application and focus solely on coding instead of switching from coding to config back and forth.
For that, open your terminal and type:
ionic generate service party/party
ionic generate component party/detail-party
ionic generate component party/create-party
It will generate a bunch of files. You can see the output in the terminal:
> ng generate service party/party --project=app
CREATE src/app/party/party.service.spec.ts (352 bytes)
CREATE src/app/party/party.service.ts (134 bytes)
[OK] Generated service!
> ng generate component party/detail-party --project=app
CREATE src/app/party/detail-party/detail-party.component.scss (0 bytes)
CREATE src/app/party/detail-party/detail-party.component.html (31 bytes)
CREATE src/app/party/detail-party/detail-party.component.spec.ts (732 bytes)
CREATE src/app/party/detail-party/detail-party.component.ts (292 bytes)
[OK] Generated component!
> ng generate component party/create-party --project=app
CREATE src/app/party/create-party/create-party.component.scss (0 bytes)
CREATE src/app/party/create-party/create-party.component.html (31 bytes)
CREATE src/app/party/create-party/create-party.component.spec.ts (732 bytes)
CREATE src/app/party/create-party/create-party.component.ts (292 bytes)
[OK] Generated component!
Now we can start coding. First, let’s open the party.routes.ts file and add the newly created components and their routes:
import { Routes } from '@angular/router';
import { CreatePartyComponent } from './create-party/create-party.component';
import { DetailPartyComponent } from './detail-party/detail-party.component';

import { PartyPage } from './party.page';

export const routes: Routes = [
  {
    path: '',
    component: PartyPage,
  },
  {
    path: 'new',
    component: CreatePartyComponent,
  },
  {
    path: ':partyId',
    component: DetailPartyComponent,
  },
];
NOTE: At this point you might get an error depending if the CLI created those pages as standalone components or not, so open each component and add the property
standalone: trueto the decorator if missing.
Now, you can run your application with ionic serve, and when you log in, you’ll be redirected to
the main route, where you’ll see the party page, it’s empty right now, but don’t worry about it, our
next step will be to add the functionality to show the list of parties there.
Listing Parties from Firestore
We’ll start with listing items from the database, in this case, the parties. A party has several properties:
{
  id: string; // The ID of the document.
  name: string; // The user friendly name.
  date: number; // The date it is happening.
  ticketPrice: number; // The price for people to go into the party.
  cost: number; // The $$ you're spending throwing the party.
  revenue: number; // The income - the expenses.
}
Let’s create a file called src/app/party/party.model.ts and add the interface there to use through
the app:
export interface Party {
  id: string;
  date: number;
  name: string;
  ticketPrice: number;
  cost: number;
  revenue: number;
}
In the PartyPage we want to show a list of the parties we have in the application. For that, let’s
open the party.page.ts file, and let’s create a class variable called partyList.
By now, the party page class should look like this:
import { Component } from '@angular/core';
import {
  IonContent,
  IonHeader,
  IonTitle,
  IonToolbar,
} from '@ionic/angular/standalone';
import { of } from 'rxjs';

@Component({
  selector: 'app-party',
  templateUrl: './party.page.html',
  styleUrls: ['./party.page.scss'],
  standalone: true,
  imports: [IonContent, IonHeader, IonTitle, IonToolbar],
})
export class PartyPage {
  readonly partyList$: Observable<Party[]> = of([]);
}
We’ll initialize the partyList property as an empty observable array, we don’t have anything to
show in our database at this point, so we’ll leave it like that while we work on adding items to the
database.
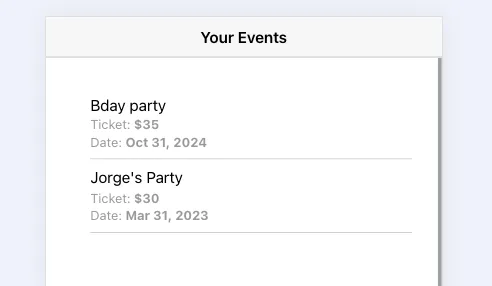
Now, we can create a simple (but elegant) template to display the list of parties once it’s ready.
First, we want to change the page’s header, so open party.page.html file and replace the header
with this:
<ion-header>
  <ion-toolbar>
    <ion-title>Your Events</ion-title>
  </ion-toolbar>
</ion-header>

<ion-content class="ion-padding"></ion-content>
Next, we want to create a list, for that we can use Ionic’s ion-list component, the idea is that
we loop through partyList and display the most relevant information of each event:
<ion-header>
  <ion-toolbar>
    <ion-title>Your Events</ion-title>
  </ion-toolbar>
</ion-header>

<ion-content class="ion-padding">
  <ion-content class="ion-padding">
    @if (partyList$ | async; as partyList) {
    <ion-list>
      @for(party of partyList; track party) {
      <ion-item tappable routerLink="/party/{{ party.id }}">
        <ion-label>
          <h2>{{party?.name}}</h2>
          <p>Ticket: <strong>${{party?.ticketPrice}}</strong></p>
          <p>Date: <strong>{{party?.date | date }}</strong></p>
        </ion-label>
      </ion-item>
      }
    </ion-list>
    }
  </ion-content>
</ion-content>
Note that when you click on an item on the list, it will take you to the /party/id URL, which will
trigger the DetailPartyComponent.
Then, we want a way for the user to add new parties, for that, we’re going to create a floating
action button the users can click and navigate to the CreatePartyComponent.
To create the Floating Action Button, Ionic has a handy component called ion-fab where you pass
the position, and they take care of the rest :)
<ion-header>
  <ion-toolbar>
    <ion-title>Your Events</ion-title>
  </ion-toolbar>
</ion-header>

<ion-content class="ion-padding">
  <ion-content class="ion-padding">
    @if (partyList$ | async; as partyList) {
    <ion-list>
      @for(party of partyList; track party) {
      <ion-item tappable routerLink="/party/{{ party.id }}">
        <ion-label>
          <h2>{{party?.name}}</h2>
          <p>Ticket: <strong>${{party?.ticketPrice}}</strong></p>
          <p>Date: <strong>{{party?.date | date }}</strong></p>
        </ion-label>
      </ion-item>
      }
    </ion-list>
    }

    <ion-fab vertical="bottom" horizontal="end" slot="fixed">
      <ion-fab-button routerLink="/party/new">
        <ion-icon name="add"></ion-icon>
      </ion-fab-button>
    </ion-fab>
  </ion-content>
</ion-content>
Remember that since we’re working now with Standalone components and no modules we have to import every item we’re using into our class:
import { CommonModule } from '@angular/common';
import { Component } from '@angular/core';
import { RouterLink } from '@angular/router';
import {
  IonContent,
  IonFab,
  IonHeader,
  IonIcon,
  IonItem,
  IonLabel,
  IonList,
  IonTitle,
  IonToolbar,
} from '@ionic/angular/standalone';
import { addIcons } from 'ionicons';
import { add } from 'ionicons/icons';
import { Observable, of } from 'rxjs';
import { Party } from './party.model';

@Component({
  selector: 'app-party',
  templateUrl: './party.page.html',
  styleUrls: ['./party.page.scss'],
  standalone: true,
  imports: [
    IonIcon,
    IonFab,
    IonLabel,
    IonItem,
    IonList,
    IonContent,
    IonHeader,
    IonTitle,
    IonToolbar,
    RouterLink,
    CommonModule,
  ],
})
export class PartyPage {
  readonly partyList$: Observable<Party[]> = of([]);

  constructor() {
    // This is how we import icons into the app
    addIcons({
      add,
    });
  }
}
Adding new items to the database
We have our page to show the list of parties, but no party to show, so now would be a good time to
start adding them, for that, let’s work on our CreatePartyComponent. First, let’s open our
create-party.component.ts file, and make it look like this:
import { Component, inject } from '@angular/core';
import { Router } from '@angular/router';
import { Party } from '../party.model';

@Component({
  selector: 'app-create-party',
  templateUrl: './create-party.component.html',
  styleUrls: ['./create-party.component.scss'],
  standalone: true,
})
export class CreatePartyComponent {
  private readonly router = inject(Router);

  name?: string;
  ticketPrice?: number;
  cost?: number;
  date?: Date;

  async createEvent(party: Partial<Party>): Promise<void> {
    // Save the party to the database
    console.log(party);
    await this.router.navigateByUrl('party');
  }
}
Here’s what’s going on:
- We’re importing the Party model, and the angular router.
- Were creating class variables for
name,ticketPrice,cost, anddate, to use them in the HTML template. - We’re creating a placeholder function call
createParty()which we’ll use to create the party and then send the user back to the party list. - We’re creating the
isValid()function, this will check if all the items are there, as a way to validate the submit form.
NOTE: We’re not going to use reactive forms in this one so you can see template forms and decide the one you like using more.
Now we can move to the template, so let’s open the create-party.component.html file, and the first
thing we want to do is add a header.
We’ll add a simple title, and a back button using the ion-back-button component:
<ion-header>
  <ion-toolbar>
    <ion-buttons slot="start">
      <ion-back-button defaultHref="/party"></ion-back-button>
    </ion-buttons>
    <ion-title>Add new Event</ion-title>
  </ion-toolbar>
</ion-header>

<ion-content class="ion-padding"></ion-content>
We’ll use the angular’s FormsModule, which lets us bind the inputs with the [(ngModel)] property
(that’s why we created the class variables for the properties inside the component’s class).
The first one we’ll create will be a text input we can bind to the name property:
<ion-input
  label="Event Name"
  [(ngModel)]="name"
  type="text"
  placeholder="What's your event's name?"
  fill="outline"
/>
Next, we can add two number inputs, one for the ticketPrice and another one for the cost:
<ion-content class="ion-padding">
  <ion-input
    label="Event Name"
    [(ngModel)]="name"
    type="text"
    placeholder="What's your event's name?"
    fill="outline"
  />

  <ion-input
    label="Price"
    [(ngModel)]="ticketPrice"
    type="number"
    placeholder="How much will guests pay?"
    fill="outline"
  />

  <ion-input
    label="Cost"
    [(ngModel)]="cost"
    type="number"
    placeholder="How much are you spending?"
    fill="outline"
  />
</ion-content>
Next, we’ll use Ionic’s datetime component to show a calendar view inside the form, so that our
users can easily pick the date of their events:
<ion-header>
  <ion-toolbar>
    <ion-buttons slot="start">
      <ion-back-button defaultHref="/party"></ion-back-button>
    </ion-buttons>
    <ion-title>Add new Event</ion-title>
  </ion-toolbar>
</ion-header>

<ion-content class="ion-padding">
  <ion-input
    label="Event Name"
    [(ngModel)]="name"
    type="text"
    placeholder="What's your event's name?"
    fill="outline"
  />

  <ion-input
    label="Price"
    [(ngModel)]="ticketPrice"
    type="number"
    placeholder="How much will guests pay?"
    fill="outline"
  />

  <ion-input
    label="Cost"
    [(ngModel)]="cost"
    type="number"
    placeholder="How much are you spending?"
    fill="outline"
  />

  <ion-datetime class="party-date" size="fixed" presentation="date" [(ngModel)]="date" />
</ion-content>
And lastly, we’ll add a button to call the createEvent() function we created and pass the
properties:
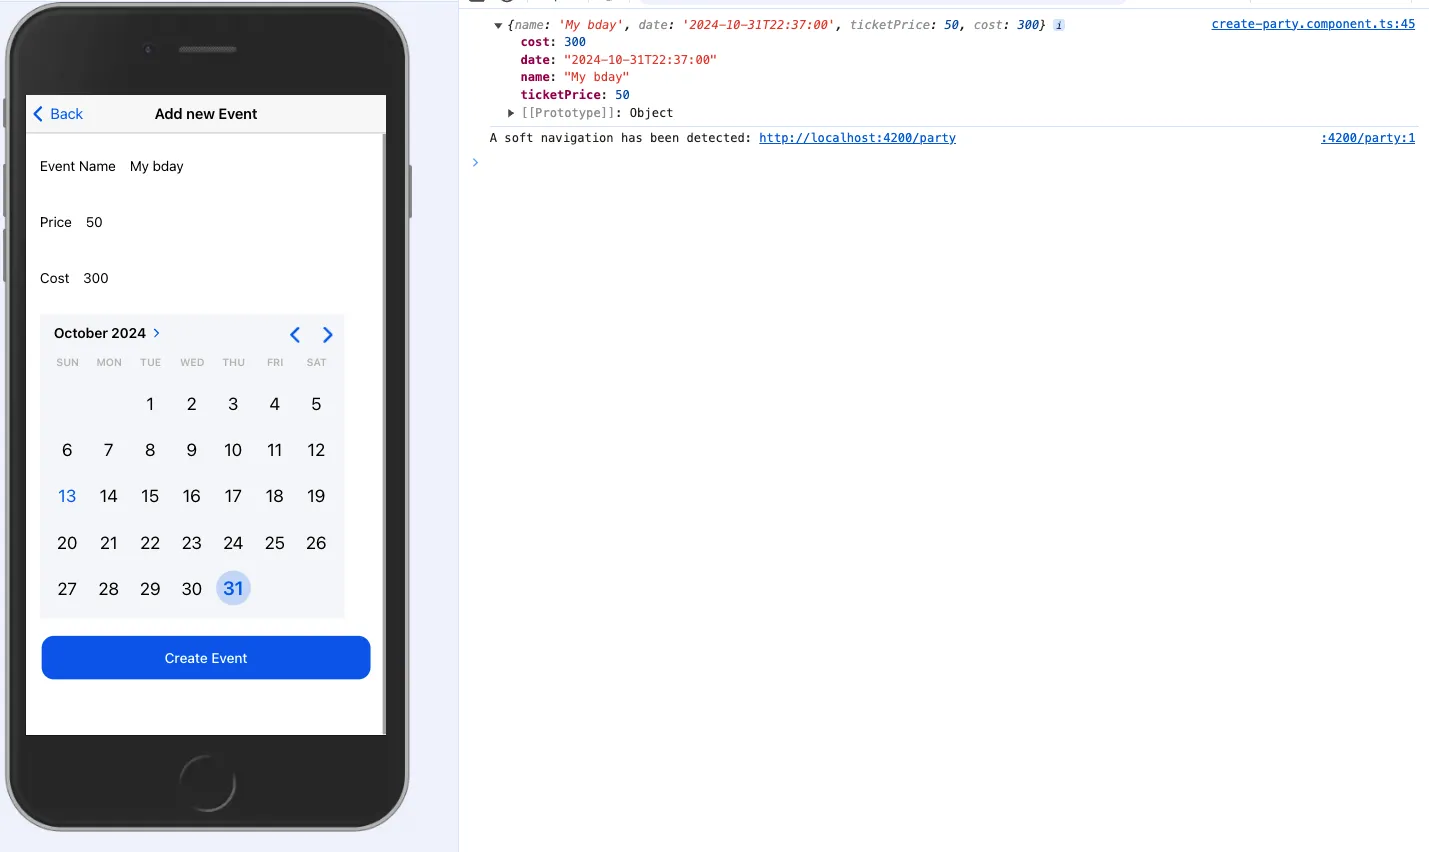
At this point, you should be able to run the application with ionic serve, navigate to the create
page, and see the form, if you add properties there and click on Create Event you’ll be able to
see the properties in the browser’s console.
So far we’ve managed to get the UI ready, but we still have no way to add those parties to the
database, for that, let’s head to the party.service.ts file, and import things we’ll need:
import { Injectable, inject } from '@angular/core';
import { addDoc, collection, Firestore } from '@angular/fire/firestore';
import { AuthenticationService } from '../authentication/authentication.service';
import { Party } from './party.model';
Here’s what we’re importing:
AuthenticationServiceto connect with the auth service, we’ll use this to get the user’s ID.addDoc, collection, Firestoreare for adding documents to the database and connecting to Firestore.
Now, let’s inject both into our service:
private readonly auth = inject(AuthenticationService);
private readonly firestore = inject(Firestore);
And lastly, let’s create our createParty() function, it will take the party as a parameter, and
the first thing that it needs to do is to get the user’s ID.
createParty(party: Partial<Party>) {
  return this.auth.getUser().pipe(
    filter((user) => !!user),
    map((user) => user.uid)
  );
}
We’re getting the user’s ID to store the parties under the user’s document in the Firestore
database. Then, we want to get a reference to the party collection. Think of it like the location
where we want to add the new document.
createParty(party: Partial<Party>) {
  return this.auth.getUser().pipe(
    filter((user) => !!user),
    map((user) => user.uid),
    tap((uid) => {
      const partyCollection = collection(
        this.firestore,
        `users/${uid}/party`
      );
    })
  );
}
The firestore collection method takes two parameters, the Firestore instance, and the path to
where we’ll store the document.
And lastly, we want to add the addDoc function and pass that collection reference, and the object
we’ll be storing:
createParty(party: Partial<Party>) {
  return this.auth.getUser().pipe(
    filter((user) => !!user),
    map((user) => user.uid),
    tap((uid) => {
      const partyCollection = collection(
        this.firestore,
        `users/${uid}/party`
      );
      return addDoc(partyCollection, party);
    })
  );
}
You can test this right now, let’s go to the create-party.component.ts and inject this party
service:
private readonly partyService = inject(PartyService);
private readonly router = inject(Router);
And let’s see our createEvent() function, right now it is a placeholder that looks like this:
async createEvent(party: Partial<Party>): Promise<void> {
  // Save the party to the database
  console.log(party);
  await this.router.navigateByUrl('party');
}
And we’ll do 3 things, first, we want to initialize the revenue as 0, since no party will start
with tickets already sold, second, we want to call the service to create a party, and lastly, remove
the async/await and make the function use rxjs.
createEvent(party: Partial<Party>): void {
  party.revenue = 0;

  this.partyService.createParty(party).subscribe(() => {
    this.router.navigateByUrl('party');
  });
}
You can go ahead and fill your form now, and you can check your database to see if the document was created or not.
If there’s any issues and the document wasn’t created feel free to shoot me a message through Linkedin.
Fetching items from the Firestore database
Now that we’re adding items to the database would be a good time to connect a function that can list
them, for that, let’s get back to the party.service.ts file and create a function called
getPartyList.
As the create function, this function needs to get the user’s ID, and then get the collection of parties from the database.
getPartyList() {
  return this.auth.getUser().pipe(
    filter((user) => !!user),
    map((user) => user?.uid),
    switchMap((userId) => {
      const partyCollection = collection(
        this.firestore,
        `users/${userId}/party`
      );
    })
  );
}
Once we have that reference, we’ll return the collection’s data.
getPartyList() {
  return this.auth.getUser().pipe(
    filter((user) => !!user),
    map((user) => user?.uid),
    switchMap((userId) => {
      const partyCollection = collection(
        this.firestore,
        `users/${userId}/party`
      );
      return collectionData(partyCollection, { idField: 'id' }) as Observable<
        Party[]
      >;
    })
  );
}
collectionData returns an observable of the collection, and we’re passing the { idField: 'id' }
property because we don’t have the ID stored inside the document, this property grabs the ID from
the document’s metadata and adds it to the end object in our case as a property called id.
Now we can go back to the PartyPage and connect this new function so that we can see the list of
parties in our application, so let’s open the party.page.ts file, and first, inject the part
service:
private readonly partyService = inject(PartyService);
readonly partyList$: Observable<Party[]> = of([]);
Next, look for this line where we initialized the parties, and replace it with the initialization of the parties from the part service:
readonly partyList$: Observable<Party[]> = this.partyService.getPartyList();
If you navigate to /party now you should be able to see the list of parties we created
Navigating to the detail page
If you click on one of the parties in the list, you’ll be able to navigate to the
DetailPartyComponent, right now it doesn’t have much, it’s the default Angular component
placeholder that says:
<p>detail-party works!</p>
We’re going to start by initializing the current object we’ll see, the event or party we’re
navigating to, for that, let’s go into the detail-party.component.ts file, and make it look like
this:
import { Component, inject } from '@angular/core';
import { ActivatedRoute, Router } from '@angular/router';
import { Observable, switchMap } from 'rxjs';
import { Party } from '../party.model';
import { PartyService } from '../party.service';

@Component({
  selector: 'app-detail-party',
  templateUrl: './detail-party.component.html',
  styleUrls: ['./detail-party.component.scss'],
  standalone: true,
  imports: [],
})
export class DetailPartyComponent {
  private readonly partyService = inject(PartyService);
  private readonly router = inject(Router);
  private readonly route = inject(ActivatedRoute);

  readonly currentParty$: Observable<Party> = this.route.params.pipe(
    switchMap((params: { [key: string]: string }) => {
      return this.partyService.getPartyDetail(params['partyId']);
    })
  );
}
Let’s focus on the currentParty$, the observable is doing 2 things:
- It gets the current party id from the route.
- It gets the current party from the service.
But we don’t have a function to get the current party from the database, so let’s fix that first, go
to the party.service.ts file, and create a function called getPartyDetail(), it should take the
partyId as a parameter:
getPartyDetail(partyId: string): Observable<Party> {
  // Get the actual document from Firestore
}
We’ll use the same approach to when we got the list of parties, we’ll get the userId, to create
the path to the database, then use rxjs to chain those together and get the document from the
database:
getPartyDetail(partyId: string): Observable<Party> {
  return this.auth.getUser().pipe(
    filter((user) => !!user),
    map((user) => user?.uid),
    switchMap((userId) => {
      const partyDocument = doc(
        this.firestore,
        `users/${userId}/party/${partyId}`
      );
      return docData(partyDocument, { idField: 'id' }) as Observable<Party>;
    })
  );
}
Notice we are using doc() to create a reference to the document in Firestore, and then docData()
to get that document into our application, so don’t forget to add both of them to the
@angular/fire/firestore imports:
import {
  doc,
  docData,
  ...,
} from '@angular/fire/firestore';
Now we can start working on the view. After all, what good does it to have all this data if we can’t see it 😅.
For that, let’s go to the detail-party.component.html, and the first thing we want to add is a
header:
@if(currentParty$ | async; as currentParty) {
<ion-header>
  <ion-toolbar>
    <ion-buttons slot="start">
      <ion-back-button defaultHref="/party"></ion-back-button>
    </ion-buttons>
    <ion-title>{{ currentParty.name }}</ion-title>
  </ion-toolbar>
</ion-header>
}
We’re adding the regular Ionic header, with a back button and using the party’s name as the page title.
One thing you’ve probably noticed is that we’re using defaultHref in our back buttons, this is
because we want these specific back buttons to work even if the user directly navigates to this page
with the URL.
For example, if the user grabs the URL /party/4567uikmnbvfr6u and pastes it in the browser, you
won’t see the back button because there’s no page to go back to, that’s the first page the user
opened.
But, if you add the defaultHref, Ionic will show the back button and when clicked it will take the
user to the URL we’re pointing out there.
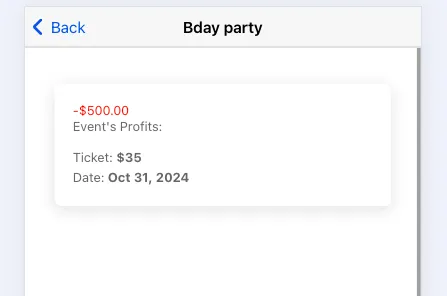
After the header, let’s add some content to display the properties of the party:
<ion-content class="ion-padding">
  <ion-card>
    <ion-card-header>
      Event's Profits:
      <span
        [class.profitable]="currentParty.revenue - currentParty.cost > 0"
        [class.no-profit]="currentParty.revenue - currentParty.cost <= 0"
      >
        {{ currentParty.revenue - currentParty.cost | currency }}
      </span>
    </ion-card-header>
    <ion-card-content>
      <p>Ticket: <strong>${{ currentParty.ticketPrice }}</strong></p>
      <p>Date: <strong>{{ currentParty.date | date }}</strong></p>
    </ion-card-content>
  </ion-card>
</ion-content>
We’re showing whatever properties we have in the party, and we have a card header that shows the
current profits. Profit is the revenue minus the cost, and if we’re on negative values we’re adding
a CSS class called no-profit; if we’re on positive values, we’re adding the class profitable.
You can go ahead and add both to the CSS file:
.profitable {
  color: #22bb22;
}

.no-profit {
  color: #ff0000;
}
Now, if you run your app and navigate to the detail page, you should be able to see all the properties right there in the page.
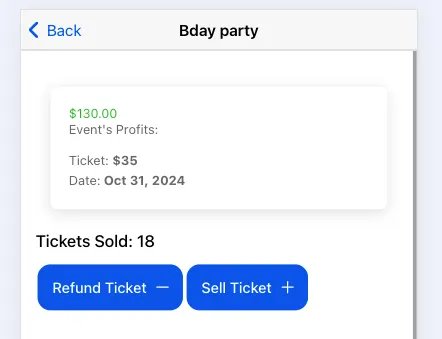
Working with Transactions
It’s not fun to see that profits are in the red, so to fix that, we’ll add some functionality to be able to sell tickets, that way we can increase the revenue until the profits are no longer in the red.
Since we’re on the detail-party.component.html file let’s handle the view first, right below the
card, you’ll add a title showing the number of tickets sold, then add a couple of buttons that show
a + and a - sign, we’ll use them to either add or remove tickets sold (We can call them sell and
refund).
<h5>Tickets Sold: {{ currentParty.revenue / currentParty.ticketPrice }}</h5>

<ion-button (click)="addTicketOperation('refund', currentParty)">
  Refund Ticket
  <ion-icon slot="end" name="remove"></ion-icon>
</ion-button>

<ion-button (click)="addTicketOperation('add', currentParty)">
  Sell Ticket
  <ion-icon slot="end" name="add"></ion-icon>
</ion-button>
You’ll see an error because the addTicketOperation() function doesn’t exist. So let’s take a
moment and add it. It will get the type as a parameter, the type is if we’re doing a refund, or
selling a ticket.
Then, it will call the party service, and call the addTicketOperation() function from that service
(we’ll create it next), and send a few parameters:
- The party’s ID.
- The ticket price.
- The type (refund or add).
addTicketOperation(type: string, currentParty: Party) {
  return this.partyService.addTicketOperation(
    currentParty.id,
    currentParty.ticketPrice,
    type
  );
}
Now, let’s move to the party.service.ts file and create the method there too, as the previous
methods, we’ll get the user’s ID and set it up to perform the business logic.
addTicketOperation(
  partyId: string,
  ticketCost: number,
  type: string = 'add'
) {
  return this.auth.getUser().pipe(
    filter((user) => !!user),
    map((user) => user?.uid),
    switchMap((userId) => {
      // We'll add the logic here later
      return EMPTY;
    }),
    catchError((error) => {
      console.error('Error adding ticket operation: ', error);
      return EMPTY;
    })
  );
}
Next, we want to create a reference to the document for that party in Firestore:
addTicketOperation(
  partyId: string,
  ticketCost: number,
  type: string = 'add'
) {
  return this.auth.getUser().pipe(
    filter((user) => !!user),
    map((user) => user?.uid),
    switchMap((userId) => {
      const partyDocRef = doc(this.firestore, `users/${userId}/party/${partyId}`);
      return EMPTY;
    }),
    catchError((error) => {
      console.error('Error adding ticket operation: ', error);
      return EMPTY;
    })
  );
}
And lastly, we’ll use the runTransaction() function to update the revenue.
addTicketOperation(
  partyId: string,
  ticketCost: number,
  type: string = 'add'
) {
  return this.auth.getUser().pipe(
    filter((user) => !!user),
    map((user) => user?.uid),
    switchMap((userId) => {
      const partyDocRef = doc(
        this.firestore,
        `users/${userId}/party/${partyId}`
      );
      return runTransaction(this.firestore, async (transaction) => {
        const partyDoc = (await transaction.get(
          partyDocRef
        )) as DocumentSnapshot<Party>;
        const party = partyDoc.data() as Party;
        const newRevenue =
          type === 'add'
            ? party.revenue + ticketCost
            : party.revenue - ticketCost;
        transaction.update(partyDocRef, { revenue: newRevenue });
      });
    }),
    catchError((error) => {
      console.error('Error adding ticket operation: ', error);
      return EMPTY;
    })
  );
}
This is something new, so let me break down what happened there:
The runTransaction() function takes the Firestore instance and runs a transaction in the database.
A transaction will make sure you update the proper value. Let me explain:
What happens if you have 10 people selling tickets?
What happens when they all click the sell button at the same time?
Without a transaction, they would get the current revenue, let’s say they all get 0, and add the new ticket value, so when they all update the document, they’re all setting the new revenue as 15, for example.
With a transaction, things are a bit different. Here’s how it happens:
- Firestore runs the transaction.
- You get the document ready to update whatever property you want to update.
- Firestore checks if the document has changed, if not, you’re good, and your update goes through.
- If the document has changed, then Firestore gets you the new version of the document, then it runs your updates again.
That way, if they all sell a ticket at the same time, Firestore will start processing those transactions, and instead of they overwrite each other’s work, it will update the proper values.
In the end, you can start clicking the sell and refund buttons and you’ll be able to see how the application is working.
Deleting Items from Firestore
We want to add one last feature to our application, we want to add the ability to remove parties
from the system, we’ll do it in reverse order this time, since we’re already in the
party.service.ts file, let’s create a function called deleteParty():
deleteParty(partyId: string): Observable<void> {}
Then, we’ll do what we’ve been doing for a while, we get the user’s ID, and we create a reference to the document we want to delete:
deleteParty(partyId: string): Observable<void> {
  return this.auth.getUser().pipe(
    filter((user) => !!user),
    map((user) => user?.uid),
    switchMap((userId) => {
      const partyDocument = doc(
        this.firestore,
        `users/${userId}/party/${partyId}`
      );

    })
  );
}
And lastly, we call Firestore’s deleteDoc() function, which takes the document reference as a
parameter:
deleteParty(partyId: string): Observable<void> {
  return this.auth.getUser().pipe(
    filter((user) => !!user),
    map((user) => user?.uid),
    switchMap((userId) => {
      const partyDocument = doc(
        this.firestore,
        `users/${userId}/party/${partyId}`
      );
      return deleteDoc(partyDocument);
    })
  );
}
Remember that we have to add the deleteDoc() function to the firestore imports:
import {
  ...,
  deleteDoc,
} from '@angular/fire/firestore';
Now let’s move to the detail-party.component.ts file and create the function that will call the
firestore delete functionality:
deleteParty(partyId: string): void {
  this.partyService.deleteParty(partyId).subscribe(() => {
    this.router.navigateByUrl('party');
  });
}
The function is doing two things:
- It is calling the service to delete this party.
- It takes the user to the party page to show the list of parties available.
Now, before moving into the view to create the button to call this function, we need to talk about something. This is a horrible practice.
Deleting an item from the database is a destructive operation. There’s no recovering from that one, so what happens when your user clicks by mistake? Do you want to remove the item without hesitation?
Instead of doing that, you can create a confirmation alert, that you call instead of the delete method, and the alert calls the method if the user confirms, you can see how to do that in the Ionic Framework docs
Having said that, let’s create a floating action button that calls the deleteParty() function
below the add and remove buttons:
<ion-fab vertical="bottom" horizontal="end" slot="fixed">
  <ion-fab-button (click)="deleteParty(currentParty.id)" color="danger">
    <ion-icon name="remove"></ion-icon>
  </ion-fab-button>
</ion-fab>
And that’s it, you can click that button and delete the party from the database, it will take you to the list page.
What’s next?
First of all, congratulations!
This was a long tutorial, and you went from 0 to installing and initializing Firebase in your Ionic project, handling user authentication, and full database interactivity.
Please, do something nice for you to celebrate :)
The next thing on your mind should be practice.
And the best way to practice is implementing all of this in a product of your own.
So please, once you’re done with this, shoot me an message. I’m always available at Linkedin, and let me know what you learned from this or if you feel it’s missing something.
I’m working on adding more content about Firebase, so feedback is always appreciated.
